Monday, April 10, 2023

7th Street Shops; Pre-History Part 5

"The townsite of Romley is located at roughly 10,500' ASL near the base of the north shoulder of the ridge running more or less southward to the peak of Pomeroy Mt. El. 13,161' ASL. Just to it's east runs the small creek of Pomeroy Gulch which empties into Chalk Creek north east of the town site..."

Romley (formerly Murphy's Switch) about 1900

In the summer of 1910 the Colorado & Southern mainline still came west down Trout Creek Canyon, crossed the Arkansas River and continued up Chalk Creek to the top of Altman Pass. This was the location of the Alpine Tunnel which passed thru the Continental Divide at that point.

In those days Buena Vista was a short branch from the Wye at Schwanders located at the bottom of Trout Creek Canyon before the line crossed the River.

Romley depot & boarding - ? artist (1950s?).


In late summer Trout Creek washed out the line and in the fall of 1910 a small cave-in at the Tunnel cut off the entire Gunnison Division. This isolated the Chalk Creek line completely and suddenly there was a microcosm of the narrow gauge from Buena Vista to Hancock. It was a sad moment in the Railroad's history but fortuitous for a modeler with limited space and budget. I had planned one day to model most of the branch but at the moment Romley was all I had room for.

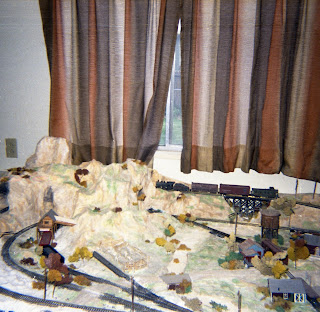
In December 1983 my first wife and I rented a home in Parker, Colorado and once again I had a place where I could build a layout. As I recall it was about 10 feet long and 18 or so inches wide. I allowed this was enough room to make a fair representation of the Romley station in 1/4" scale..

Traffic on the line was light and rarely was there more than one locomotive for 3 trains a week. It wasn't long before traffic to Hancock and Romley became the west terminal. Buena Vista had the most activity but it was a pair of very long tracks where cars were collected for exchange to and from Leadville. The Denver & Rio Grande line up the Arkansas River to Leadville was the only connection the road had to the rest of the system. Buena Vista would have been as interesting as Romley but the latter with it precipitous location seemed more interesting to model and was a better choice for the room I had.

Since the track above Romley was no longer maintained, the wye at Hancock was out of reach. A turntable was put it just above the depot in 1915. The large depot that was moved from Hancock in 1890 burned down in 1908 and a new smaller depot was built at Romley. I found a watercolor at an antique show that I instantly recognized and purchased very cheap (the artist is unknown). This was some years after the layout had been dismantled but it still contributed to my understanding of the location. The painting shows, left to right, the 2 story boarding house and the stable behind it. Across the road was the depot and the Post Office below it. The road on the left goes up to the Mary Murphy Mine. If you study the first photo you will see how the structures related the same.

The tram house just above the grade

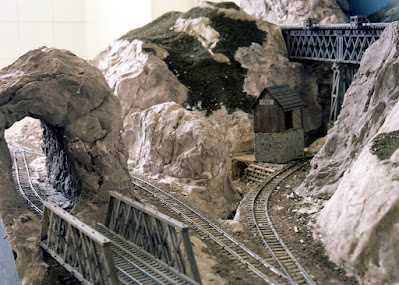
The layout included Pomeroy Gulch and iron truss bridge. I laid my track as much as I could discern up to the depot - which was never ready for this layout. I advanced the scenery fairly well and eventually had a few representative buildings but there were a lot of compromises. My knowledge of the location was still very limited in 1983; very little detail was available in what few books I could obtain or what I could find on location. We had visited the site a few years earlier and camped on the town site below the grade. By then most of the structures were collapsed or gone.
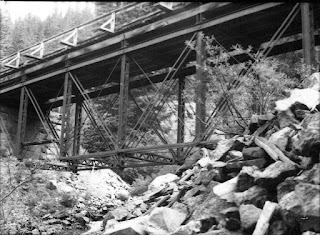
The Pomroy iron truss bridge - 1981

The photo below was very helpful in building the bridge. The cars on my bridge were scratch built using Grandt Line parts and trucks. This was before San Juan Car Co. offered O scale kits of the cars in the early1990s. In fact, they used my drawings of the cars to develop the kits.

Some time in the 1890s the railroad built a trestle behind the truss bridge in order to extend the passing track down line from the gulch. You can see this extension in the top photo. I was not aware of the trestle when I built this layout as there was no evidence of it when we camped there in the summer of 1981. This trestle was apparently abandoned by 1918, the date of the layout, and I incorrectly double tracked the truss bridge.

Several scratch built box cars over the bridge


This would be a morning view at Romley


So far as I know there was never a coaling platform - or any locomotive facilities except for the turntable - at Romley. The platform seen here was a kit of the coaling platform at Alpine Station at the Pacific end of the Tunnel. I don't remember who made the kit but I built one and plopped it down here.
No. 62 approaches St. Elmo
 As the layout grade extended a few feet beyond the bridge I optimistically planted a station sign for St. Elmo which was a few miles from Romley. Golf was a station between where the railroad serviced a huge 100 stamp mill. The mile marker and elevation on the post are correct for the location indicated. 

My locomotive was the 1/4" scale no. 62, that I had previously converted from the no. 60 kit. I created the illusion of smoke from the stack with ink dyed cotton on a wire that was attached to the cinder catcher and wiggled during a slow shutter exposure. Today we would Photoshop the smoke into the photo.

The engine was accompanied by several freight cars, Many of them were pre C&S cars letters for the current company. By 1918 the railroad had gotten rid of most of these cars partly because of Interstate Commerce Commission laws. Most of the cars were scratch built but the combine was a modified kit who's maker I do not remember. It represented C&S no. 22. At this point I did not have a caboose. It wasn't necessary because the combine doubled as the caboose. I built the Don Winters caboose after we moved to Colorado Springs later in 1984. However, I probably purchased the kit at the 4th National Narrow Gauge Convention in Denver of that year.
 
The one freight car that was built from a kit was the Model Masterpiece composite frame coal car in the last color photo.
The yard at Romley

I believe I scrapped this layout when we moved from Parker; though it seems part of it was in a spare bedroom in the house we rented in Colorado Springs. As I grew to understand the station more I became dissatisfied with the layout. I felt I could do better when a larger space became available, But by the time that happened I had moved on to another part of the railroad and adopted another scale. In the meantime there would be another, smaller shelf layout of this location in O scale.

I have visited Romley many times and each time a little more of it has disappeared. The last time I went thru Romley was in 2006 on our way to the 26th National Narrow Gauge Convention in Durango. We crossed over Hancock Pass (12,140' ASL), a fairly mild 4-wheel road and followed the railroad grade down to U.S. Hwy 50. Then from Montrose we headed south over Red Mountain Pass to Durango. We did it all in my infamous 1998 Jeep

My incorrect depiction at the Watercolor location
No 62 in comparison to my stock No. 60

Wrangle. That was a long day and the long way from Denver. As I recall we rode the Georgetown Loop and the Leadville Railroad to Climax while we were at it. Wow! We did all that in one day?


Tuesday, April 4, 2023

Tribute - Harry Brunk 2

The Hullkill mine head above Idaho Springs
I first encounter Harry Brunk in the pages of the "Narrow Gauge & Short Line Gazette". I discovered the "Slim Gauge News" at about the same time, but Harry's presence there was not readily apparent. Harry was the Leighton Slough of the "News" who wrote the column, "The HOn3 Scene". The SGN was published 1971 - 1974.

"The HOn3 Scene", which was an informative column meant to keep HOn3 modelers appraised of new HOn3 stuff, usually started with Leighton describing a recent adventure or encounter with another character devised out of phonetic "engineering". Leighton, a retired Yard Master (and crusty old Coloradoan) of the U.C.&N. Ry. was apparently in charge of a water stop with a leaky tank. He put up with the dripping noise on a plank under the tank for 6 months before finally getting fed up enough to fix it - in the dead of winter. ("Hmmmm..." says another crusty old Coloradoan.)

Could this perhaps be Leighton's water tank? 
The intrepid Leighton (Winter 1973 SGN) drained the tank, collected all of his tools and materials in a bucket and went up the ladder with the rope tied to himself and to the bucket still on the ground. He chipped away the ice and snow to open the hatch but when he turned to pull the bucket up the mere tug on the rope caused him to slip on the snow. That sent him flying off of the roof. However, the rope got tangled in the top of the ladder and stopped him high enough that he bounce off of the side of the tank. Of course, he was just out of reach of the ladder and naturally, even a sneeze would send him to the ground.
The famous church in Georgetown
And, that's where Leighton suddenly realized he was rambling and got on with business. Well! I guess you could say Leighton - Harry - was good at tales of suspense. He leaves Leighton hanging, as it were, in a rather precarious position - not just hanging off of a water tank - but in the dead of a cold Colorado winter. I don't recall that he ever explained how he got out of that fix. You might get the impression; perhaps Leighton was just yarnin' - being a bit of a yarn himself.
St. Charles type box car converted from a RGM kits

A wayside industry near Georgetown
The famous Devils Gate Bridge from the backside

 
I count it fortunate to have been friends with Harry Brunk. As described in the previous part of this Tribute, Daryl Leedy, Bob Axsom, Joe Crea (trip 1) or Mike Pine (trip 2) and I jumped in a car on a Saturday morning and drove the 3 or so hours from Denver to where Harry and Bobby lived in central Nebraska. Each time we stayed a few hours, soaked in the stories, the layout and the good company and then stopped on the way home in the small town for dinner.

 UC&N stray box spotted at Bath, C&S - 1909 (Sn3)
On our second visit I learned that Harry and another modeler had exchanged cars from each other's roads. Since I modeled in Sn3 an exchange wasn't really an option so I asked if he would letter one of my cars. Since my modeling period was some 25 years earlier than the U.C.&N. Harry applied the older herald that was more appropriate for a car of his road to show up on my early C&S layout. I sent a car already painted and he graciously lettered and weathered it. This car is one of my treasured possessions.

During the visit we talked about the pros and cons of the scales we each modeled. He described how the HOn3 engines tended to burn up motors relatively often and he regularly had to re motor a model. Naturally, (having become utterly disgusted with HOn3 shortcomings more than once) I talked up my satisfaction with Sn3. Harry was not about to convert - of course - and it wasn't my intent to sway him but he did express his admiration for the scale. If I recall, I sent him a Cimarron Works box car kit in appreciation for lettering my car. I have no idea if he ever built it.


0200 is a Type II rebuild. 0107 is a  St. Charles rebuild
We continued to correspond after we moved to Montana. One day he sent me pictures that were especially interesting. The 2 photos were of 3 U.C.&N. cinder cars Harry scratch built. Like all of his rolling stock they were C&S prototypes. This was especially interesting because I had researched the cars over 20 years earlier and thereafter several great models had been built. Moreover, Berlyn Locomotive Works imported a R.T.R. model in O scale. Modelers like Harry using my efforts to enrich their experience is the reward that made the effort worthwhile.
 
Another St. Charles conversion

The first photo was of a 1907 (Type II) coal car (0200 in the upper photo) converted to a cinder car. On the C&S it was 1 of 15 rebuilt with side dump doors and sent to the Black Hills in 1913. The U.C.&N story was likely parallel this. Several years later they were returned to the C&S as cinder cars. But it was the other cars in the photos that were of particular interest to me. These are models of cars that the C&S rebuilt from St. Charles built cars purchased by the Union Pacific Denver & Gulf in 1898
St. Charles conversion before 1910 (On3)
The C&S took over the U.P.D.& G.cars early in 1899 and they converted 8 of them (plus an earlier coal car) into side dump cars between 1903 & 1906. But they were not for collecting cinders. They were built to haul mining tailings onto trestles throughout the system to dump and fill in the trestles. They were designated non-revenue cinder cars thereafter.
Prior to 1990 I had been researching the C&Sng freight roster to developing a series of informative drawings that were more than just representation of the railroad's narrow gauge freight cars. The subject of one of the drawings was this cinder car. I built an O scale model from the drawings with working doors and dogs and a complete underframe in 1990. That year it won the Caboose Hobbies Best of Show Award at the Rocky Mountain Division NMRA Regional Convention. The car was featured in the Aug. 1991 "Model Railroader".
 
If you compare our models you may notice certain differences. Both versions are correct for the  intended time periods we each modeled. 7th Street Shops now offers a complete collection of the drawings on our website. This car and several others as well as additional details are included in the 25 sheet set.
 
Bob's Unimat lathe / mill

After we returned to Denver, Bob, who had taken many photos over both visits assembled a viewing program for the rest of us to enjoy. Some of those photos are shared here.


In 2008 Bob hired me to paint 4 of his C&S Sn3 brass locomotives. This was before 7th Street Shops was formed. I visited his home in Denver a few times and on one occasion I noticed he had a Unimat lathe. I expressed an interest in it if he was inclined to sell it. He promised to give me first crack at it if that happened.
 
Sadly, Bob was in declining health. He quit his job at Caboose Hobbies and began selling off his model railroad collection. Robert Axsom passed away in 2014 after Vicki and I had moved to Montana. One day I received an email from his widow. She informed me that Bob had willed the Unimat to me. I was stunned. I had long ago forgotten about the machine and this was completely unexpected. In honor of Bob I attached an engraved tag and will keep the Lathe as another of my treasured possessions.
 
Tokens? Memories! Of good friends who I won't forget nor forget to share.


Saturday, March 25, 2023

Building in Brass; Pre - History Part 4


Kemtron HOn3 brass kit of the D&R G C-16
I don't know of any formal (accredited) program to earn a degree in Model Master Mechanic. It is all strictly on the job training - where one is both client and service. I thought it might be interesting to give an example of  how one might go about doing that. It's all very informal really; find a model you would like to have, build it and in the process learn more about building the next one..

Fortunately, I have a few photo examples of my early "training." Among the photos I found both 35mm and medium format negatives of the Kemtron C-16 I mentioned in part 3. I built this kit over 40 years ago after I got out of the Navy. I also found I had photos that I didn't remember taking. Somewhere along the way the Model Die Cast narrow gauge engine I sold to the modular group I was a part of happened to pass before my Mamya 645.

Model Die Cast HOn3 outside frame (C-21?)

I don't know exactly when MDC first offered the powered narrow gauge 2-8-0s - about 1974 I believe - but I purchased this outside frame kit perhaps prior to the C-16. It was an intriguing project I probably bought when I became involved with Slim Rail. I didn't have a module of my own but I wanted something to run during our shows.

Building the model was fun and straight forward and, as you can see, the C&Sng was already a strong  influence upon my efforts. I gave it my own paint scheme and fictional road name. The model was airbrushed black, silver and the masked off areas were a light sea green (Humbrol). The herald was inspired by a layout idea that I began a year or two later. I briefly described that pike in part 3 along with the white metal Keystone Shay kit. Unfortunately I didn't take any photos of either the shay or the layout. I sold the Connie to the modular group when I went to school in Denver  

I've been a photo enthusiast for nearly as long as I've been a railroad modeler. I started with a Canon SLR when I joined the Service and eventually became the ships photographer while over seas. I've taken many pictures as record and many of models that help when telling this story.

Kettle Creek is located in Black Forest, CO.

The C-16 was my first brass kit. My cheap soldering iron probably came from Radio Shack and may have been as much a hindrance as it was successful but I had learned how to solder at a pretty young age; that surely helped me get thru this project. Somewhere I purchased a tube of solder paste with flux already in it - what a novel idea! It took me a while to put it together but it turns out soldering brass takes a long time anyway. It isn't the actual soldering but the preparation and jigging that takes time. I enjoyed the "doing" and was pleased with the results. I don't recall how it ran - probably not well - but that didn't discourage me. 

 D&RG C-16 with a kit-built DSP&P Waycar

 The waycar shown with the C-16 was from a kit, probably E.& B. Valley and clearly not a very accurate example of the D.S.P.& P. prototype. I don't remember when I built it as the photos were taken some time after I sold the Canon F-1 and purchased the Mamya (1981). 

Half or more of the success of any task seems to rest on a certain confidence that you know you will figure out any issues that arise. In other words, you don't lose if you don't quit. When I finished the C-16 I built Kemtron's D.& R. G. 0-6-0t with the intent of converting it to a C & S mogul. That didn't happen. 

As I described previously I became frustrated with the smallness of narrow gauge in HO scale. I finally  traded or sold off the HO stuff to purchase (as I now recall ) an O scale Denver South Park & Pacific mogul imported by Balboa. I scratch built several D.S.P. & P. freight cars to go with it. 

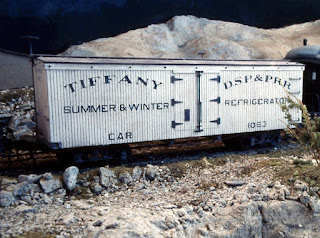
I scratch built this On3 Tiffany "freezer"...
By this point I had plenty of experience building kits of all kinds. There were very few if any South Park  car kits in O scale. There were plenty of drawings and photos, however, and I found it an easy and enjoyable transition into building models that came from no kits. All of the freight cars in these photos were scratch built by collecting or making the parts and   assembling them according to the available information. 

I did find a kit for the waycar offered by Don Winters but even that could be described as scratch building out of a box. The instruction sheet provided an elevation drawing perhaps a brief description and

... as were all of the cars in this view

these suggestions; "get a six pack of beer, look at the drawing and published photos and put the kit together." Except for the beer (which didn't seem like a good idea for this method of construction) that is what I did. It turned out to be a fun project.

Don Winters On3 waycar; post 1911 numbering

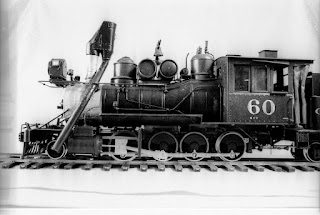
However, there came a point where I decided I still wasn't working in a direction I wanted to go. The "South Park," while fascinating in history, still didn't have the attraction its grandchild, the Colorado & Southern RY. had. I took the Mogul back to Caboose and traded it and several freight cars for an Iron Horse Models, On3, C&S, No. 60 2-8-0 kit. This was the most serious brass project I had gotten into up to that point. There were hundreds if not thousands of

I also added the detailed interior

parts in the box and the kit took many evenings to complete. If I recall, I put it together more than once because I made many mistakes.

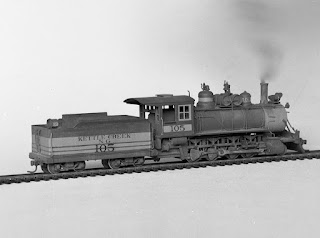
Perhaps the greatest importance of the Iron Horse kit was how much it taught me. When I finally got it put together and painted, it looked a lot like the model below that I obtained several years later. I painted and numbered the kit as C&S 62. 

I was fascinated with the orphaned (once D.S.P.& P. mainline to Gunnison ) branch known as the Buena Vista Romley division. I later understood more about

PSC On3 No. 60 was painted when I got it

how no. 62 - and all of the Rhode Island connies - were unique from each other. I re-worked the model yet again.

The photo below provides a good reference of the 62 at Buena Vista in 1925. The photo was loaned to me by its creator, Richard Kindig, with permission to make a copy negative. This was the sole motive power for that branch in the final days of that portion of the railroad.

C&S 62 at Buena Vista in 1925


Next time I'll show you what the model of 62 looked like on a later layout.

Monday, March 20, 2023

Tribute - Harry Brunk

Mainline across Clear Creek and section house

I learned a few weeks ago that Harry Brunk had passed away a week or so prior. Though we were not close friends we did talk at various times about our common interest in the Colorado & Southern narrow gauge. I had not heard from him in nearly 10 years. I don't know many details about his passing except that he was in a nursing home and that he passed just after Rick Steele and another friend visited him. 

In 2009 and again in 2010 several of us packed up from Denver and traveled to central Nebraska to see "Little Colorado", home to the Union Central & Northern. The photos shared in this post came from those visits.

An intimate view of Forks Creek

According to Harry's anthology, the U.C.&N. was a subsidiary of the Union Central R.R. that branched off at Denver and went west up Clear Creek Canyon. Of course, this was his version of history for the Union Pacific and the Colorado Central Railway that inspired his HOn3 layout. . 

Harry's railroad was fomented in that period of the hobby when "whim" was a common genre of model railroad building. Harry's involvement as a writer for the "Slim Gauge News" (1972 -1974") was a reflection of that perspective. His pseudonym for the column, "The HOn3 Scene", was Leighton Slough; say it as a phrase rather than a name. Of course, Leighton was a retired Yard Master for the U.C.&N and occasionally Leighton made reference to one Harry Brunk in the third person.

The yard at Black Hawk

In those days it was common for modelers to make up a railroad name, complete with a tongue-in-cheek story line to explain why the founders built the railroad in the first place. Often the hobbyist would lace the story with humorous innuendoes and metamorphic logic. Perhaps this was expected to defuse the stigma of "playing" with trains with absurd humor to insure that the "unenlightened" knew it was all none to serious anyway.... maybe you just had to be there. In this way a layout didn't carry the burden of actually following a particular prototype even if the layout reflected that prototype. Again, you just had to be there. When a layout didn't follow any prototype it became whimsical; it adhered to reality (the laws of physic and general railroad practices) that made it believable - but that might have been about it. Harry didn't really do any of that. He loved Colorado narrow gauge but focused only on one railroad; And then he gave it a pseudonym; Union, Central and Northern. Or; "everywhere, here and there".

What ever his intentions were, Harry built a very near copy of the Clear Creek line, He simply renamed it the U.C.&N. and then maintained a commitment to it for five decades. These two points are at the core of why the layout holds such an attraction to so many. Harry translated the C&S into a new and unique "company" by not using that prototype name; to the point we might even be indifferent to the prototype.

Downtown Black Hawk in the 1930s
 Certainly, the U.C.&N. was a whimsical idea but it was hardly whimsical in expression. Harry once told me that he wished he had used "Colorado & Southern" for the road name in the first place but by that point it was long past doing anything to change it. I'm happy he didn't try. All together this is the genius of the "Union Central & Northern" that very few layouts actually achieve.
Back to Forks Creek; westbound


Apparently the layout began in a bunk house. His life style as a cowboy was a bit more nomadic which would be inconvenient to building a railroad model. . At the same time he always lived in rural settings and this allowed a solution to the problem that was nearly as genius as his layout concept. Eventually he and his wife Bobby moved into a place where he was able to purchase a single wide mobile home and the U.C.&N. finally had a more permanent footing. Harry named the trailer "Little Colorado." Little Colorado was moved at least once before it finally failed  in 2011. At that point he had to give up the layout. Thru his good friend Rick Steele (La belle Wood Works) the layout went to the Cheyenne Depot Museum where visitors can see the layout now spread out on the second floor. 

The Argo Mill and Tunnel
The U.C.&N.was a masterful capture of the C&S Clear Creek Division. The rails began just below Forks Creek where the road branched north to Black Hawk or continued west thru Idaho Springs, Georgetown, Silver Plume to the wye beyond.  The layout included the Georgetown Loop and the famous Devils Gate Bridge.

He built from the actual settings as much as 1/87th scale would allow. I grew up in Colorado and made many trips up Clear Creek and over both Loveland Pass and thru the Tunnel. I visited Black Hawk many times including New Years day in 1989 to crawl under the type I coal car (4319) on display there. So when my friends and I stepped into Little Colorado several hundred miles from the real thing it was a bit enchanting to not only instantly "be there" but also nearly 70 years earlier! There was the Argo Tunnel, the Hulkill Mine and the Georgetown Loop. There was the Silver Plume Depot and the Black Hawk Boiler and Sheet Metal Works. But there were also things we never saw before; like the complete Forks Creek wye and all of the structures around it. Never mind the engines and cars had the  Circular and Block letter of the U.C.&N. herald - they were Colorado & Southern stock!

An intimate look at Idaho Springs

Harry was a cowboy artist. He worked for Leanin' Tree gift cards as well a number of ranches. He also apparently had showings in galleries. An artist's ability to communicate in a language without word plays an important role in his success. Fine art is a language that speaks from the soul to the soul. Harry may well be more remembered for his layout than his very fine paintings - at least for a time - because there isn't any question his layout has a firm grasp of that language. 

As I pointed out, two parties traveled to Little Colorado to visit Harry and Bobby and the famed model railroad. In both cases Bob Axsom, Daryl Leedy and I and alternately Joe Crea one year and Mike Pine the second made the round trip in a day's drive. We traveling together in one car, had a great time visiting the Brunks and enjoyed each others company the whole time. Both trips are among my fondest memories. I am fortunate to have seen the Union Central & Northern in it's original splendor. One day I may get by the Depot and enjoy the memories again.

Robert Axsom took all of the photos you see here. Bob passed away a few years after Vicki and I moved to Montana in 2010. Both of these friends and fellow C&S enthusiasts have enriched my modeling experience. I'll share a few more photos in a following post. The link below will take you to more about the layout in the Depot.

https://www.facebook.com/people/Union-Central-and-Northern-model-railroad/100063867975856/

Idaho Springs was the biggest town on the layout


This standard gauge reefer smacks of Central Valley


Friday, March 10, 2023

The Technical Files - Scale Coat Paint


 At this point it looks like Scale Coat paint is defunct. It might be interesting to take a look at the product and see if we can assimilate enough information to develop something of an unofficial history. I've actually been working on this project for about a year.

This will be an ongoing series of posts written more or less as we go. Anyone who has additional information is welcome to respond; perhaps the story will become more accurate.

For it's entire history 7th Street Shops has used Scale Coat for brass and metal covering. I cut my teeth on Floquil which was more readily available when I was a kid. I used it for model railroading projects and brushed my first brass locomotive with Engine Black, It was an awful thing to do to a nice brass model but what does a 17 or 18 y.o. know. Most of my O scale models were painted with Floquil. But I noticed Floquil tended to chip and flake on brass . I know now that part of that was because the metal was not properly prepared but it was also because the paint was not very flexible. Having worked in the auto body repair industry, I recognized its Lacquer aroma. Lacquer is  more brittle than enamel.

I started using Scale Coat I in the early 2000s when our home was in Denver a few minutes from Caboose Hobbies. They carried the Scale Coat line. Again, from experience in body and paint, I recognized that enamels were to be baked so I began baking the brass models in the kitchen oven; not an especially a good idea.

According to the pamphlet instruction sheet offered by Weaver Models (who owned Quality Craft and Scale Coat) when baked at 200 degrees-f for about 2 hours the paint would "snap" into place.

The ads called Scalecoat a revolutionary paint that did not need a primer; it could cover in one coat. This was very important to its durability and to the primary purpose for its "invention". Brass is a metal that challenges anything that is applied to it. Railroad models made with brass are typically very detailed - especially parts that are etched. Every layer of paint can hide more of this detail. 

But the real power of the paint was that one ultra thin coat was flexible and durable. A single layer of Scalecoat - especially if it is baked is very difficult to damage. I've had clients tell me they tried to strip my paint jobs and found it to be a strenuous job. I believe this is because of the paint's covering power and the "snapping" feature of the paint that when baked caused it to hug the surface. This would eventually happen without baking however because the actual process involved is the polymerization of the enamel binder into a plastic like skin. The binder oxidized.from a liquid to a solid.

I've heard that it was actually developed from the paint that the United States Navy used on its vessels. Being a Navy veteran I can believe that; Haze Grey was applied to every thing that didn't move and it was tough stuff. It had to be. Unfortunately I never had occasion to bake it. Wherever Scalecoat came from it could be summed up as advertised in the old magazines. Obviously the manufacturer achieved this remarkable performance by starting with a quality synthetic enamel binder that was less viscus, more heat tolerant and generously colored with pigments that were ground very fine and equally heat tolerant. I have had metal temperatures as high as 400 degrees-f with no effect on the paint.

Labels from the 1980 indicate the volatile organic compounds (V.O.C.) in Scalecoat was 58% which means the pigment and binder made up the other 42% of the mix. I had heard that the paint could be airbrushed straight from the bottle and I tried that a few times. It could be done many years ago but I've never tried it with later productions of the product. With the scarcity of the paint I would recommend thinning with straight Xylene even over the last manufacturers thinner. The recommended ration of thinner to paint is 1:2 in favor of the paint.

There were additives to the paint that accelerated drying time but these are still unknown to me. The Flat clear and Loco Black probably used Bees Wax as a flattening agent. 

I'll emphasize again that this is purely from my own research and not an official History. I used magazine advertisements, the Weaver Models History page on their website as well as the Walthers catalogs and a site I highly recommend no matter what scale you model, HO Seeker, as sources.

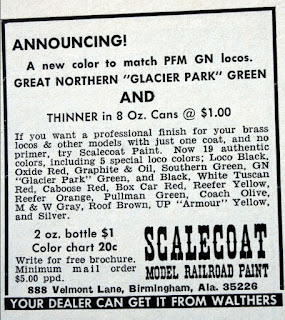
In June 1967, Iron Horse Models of Birmingham, Alabama started advertising "Iron Horse Paint" as a revolutionary new paint (MR, June 1967, page 18).  They listed 15 colors that included Locomotive Black, Graphite and Oxide Red as low gloss locomotive colors.. 

If you look up the address of  The Iron Horse on Google Map you will find a rather nice home located in a hilly, brush covered subdivision. Information on the home indicates it was built in the early 1960s and in 1967 it was about 5 years old. Apparently Iron Horse Models was a home business.

When the product first appeared on the market the volatile was a combination of Xylene and Toluene. This changed to only Xylene; probably in the late 1970s as the "greenies" began expanding their anti lead campaign into all things too nasty for even big boys to play with. Into the '80s only Xylene was listed on the label but in 1988 Federal Law required the label to include the ASTM D4236 assurance that the manufacture was responsibly warning of those nasties. How ever we may feel about such markings they can help us date the paint and draw understanding of its history.

In the beginning most of the colors were gloss but their excellent Loco Black 1 (S-1, S-1001) along with oxide Red and Graphite were matte. Later nearly all colors were gloss with only the Loco Black remaining matte. At the end of product Minute Man Scale Models added many flat colors. 

By 1970 Iron Horse Models had nearly doubled the catalog of color as well as a flat and glossy clear coat. There was never a satin or semi gloss clear until  Minute Man Scale Models acquired the line.

In November of 1967 the name of the product was changed to Scalecoat (spelling per ad) though the company name remained "Iron Horse Models" (not to be confused with PSC Iron Horse Models). From that point until December 1969 (so far as we are able to find) the paint was always sold by Iron Horse in Alabama. After Dec. 1969 Iron Horse Models disappeared.

As near as we can tell, Quality Craft Models (QCM) was established in May or June 1965. Their official history (online) establishes as fact that the Weavers started QCM in 1965. In the June 1966 Model Railroader (MR) the company announces its first anniversary with a big sale. At that time their address was a P.O. box in Villa Vista, Pennsylvania.

When we continue this discussion we'll see a transition in ownership and start examining the line, how it expanded and some of the changes that occurred.


Thursday, February 16, 2023

7th Street Shops Pre-History, Part 3

After discharge from the U.S. Navy I picked up Model Railroading again. I'd dabbled a bit and even visited the club in Pearl City, HI but I didn't have the focus during time in the service. I built a couple of the  Kemtron kits (C-16 & 0-6-0t) and still had one or two other items from pre- service years. A few years after the Navy, a buddy and I rented a house with suddenly more room. So I began planning a new layout. 

At that point I obtained a Keystone Shay Kit with the NWSL Power Kit. I decided to build a small 4'x6' layout in standard gauge for the shay. I kept it simple; a loop around point to point mainline and I decided to try my hand at hand laying the track.I had already experimented with hand laying track on a shelf layout in my bedroom before I left home years earlier. That only progressed to bench work with a small portion of "roadbed". On to that I glued match sticks with the heads cut off as ties. There wasn't any rail and it was collectively a pitiful thing.

I laid track in place and got some of it running but I don't recall if I had any switches. If I did it is likely they were not operational as I was still pretty green about all of that. I built the shay and succeeded in getting it to run very nicely. Then I made a discovery; I don't care for shays and other job specific locomotives. I am more a common carrier enthusiast. I soon traded the Keystone shay for a C&S mogul. I had also acquired a Far East Distributor "Spartan Series" mogul and I built an MDC HOn3 outside frame consolidation.

I became involved with the local model railroad club and then encountered a group that built portable modules to connect into a layout. It was HO 3 foot gauge and they called themselves Slim Rail. For a year or so I participated with the set up and showing, but I didn't have a module of my own.

I moved out of the house to an apartment with another roommate. I stayed there until I went to Denver for an Associate Degree in Engineering Drafting.  Naturally the 4'x6' layout did not survive either move.                 

My involvement with Slim Rail naturally became more detached but I kept the friends and finally decided I had enough room in my Denver apartment to build a module.That is what I share with you  for this post.

I design the module within the given parameters of 2'x4' with track entrance and exits at the prescribed places. In between I built 4 switches or turn-outs and all track was hand laid. The scenery was plaster soaked paper towels laid over wads of newspaper and then a coat of plaster over that for strength and refinement. All of the buildings and bridges were scratch built from magazine articles or of my own design. I provided back and face panels from a sheet of Masonite I'd used for another interest a few years earlier.. And I painted the back drop scene.

But the module was never finished by me as my interests were still in the Colorado & Southern narrow gauge and the models I was building in HOn3 were sadly unsatisfying to me.

I sold or traded all of my accumulated HO models for an Iron Horse Models C&S No. 60 brass kit in O scale. 

It was a set of On3 trucks that did it. Out of curiosity and intrigue I bought a set from Caboose Hobbies and that turned my track into a new direction. I sold this module to the Group as club property - along with the MDC 2-8-0 - and they finished it. It may yet be part of layout for all I know.

Next time we'll see what I did with the On3 2-8-0 kit.


Wednesday, February 1, 2023

My First Layout

 Several years ago one of my brothers handed me an envelope and inside was a strip of 110 negatives. He said, I think these are yours. I examined the frames and said I think these are photos of my old layout that I built when we lived on Pearl Drive. But there were no prints and by then most photo shops were digital. Until recently I was not sure what they were. Then I found a place that could scan negatives and create positive images. And so they were and now I share them with you as a continuation to my previous post about where 7th Street Shops came from.

It was a simple plan I believe I designed myself; very crudely, based upon what little I knew of E.L. Moore's Elizabeth Valley layout. I had previously laid a loop of track onto a 4'x8' sheet of plywood. That was set up in the garage of the new home our family had moved into The door was left open one day and when I went out to play with the trains the few plastic diesels and cars I had were stolen. But I had the plywood and managed to scrape together scrap lumber to build this 4'x6' layout. I was 16 by then.

The track was brass sectional, The plywood was used to make the roadbed and the plaster terrain was laid over wire screen - pretty standard stuff for those days. I learned quite a bit from that layout. I don't remember much about building the structures. Some of them may have been scratch built, but I'm sure just as many were commercial plastic kits. I do vaguely remember building the trestle from perhaps an E.L.Moore article. I also learned about practices I didn't care for; like plaster on screen (and as it turned out using plaster at all). I used oil paints and turpentine to color the plaster. Not recommended either.

 All the while I was using my hands to build models out of a variety of materials and the basic skills that were important for developing more advanced skills later.

But I had greater aspirations. Growing up in Colorado I was enamored with Colorado Standard Gauge (36"). It wasn't too long before the Alpine Tunnel and the Denver South Park & Pacific R.R. captured my imagination. I've been a Colorado & Southern modeler and Historian ever since. 

I sold the layout to a friends brother a few years later. 

Narrow gauge locomotives were scarce in those days and my first brass locomotive was actually a Nevada County Narrow Gauge No. 9. I don't remember who the importer was. I painted it with a brush. It was awful. And that was it's lesson to me -buy an airbrush! I sold it before I went in the Navy. No photos of that.

There were a few more false starts over the next decade that didn't go anywhere. I'll brief over them next time.